Your roof is one of the most important parts of your home, not only in terms of value but in terms of aesthetics too. Your roof makes up about 40% of your home so it plays a huge role in the curb appeal. But over time it experiences wear and tear and other damage.
One issue that can damage your roof is moss growth. At the outset, it might just seem like a cosmetic problem, but it’s much more than that. If left untreated for long, moss can cause several other problems too, slowly degrading your roof.
Today, we will talk about how you can easily remove moss from your roof.
Why Moss on Your Roof is a Problem
Before we talk about roof moss removal, let’s talk about why moss is such a headache for roofs. When moss starts growing between shingles, it doesn’t just sit there. It can lift shingles, cause cracks, and trap moisture. Over time, this can lead to leaks, damage to the roofing material, and even structural damage if it gets out of hand.
In short, moss can go from “minor nuisance” to “expensive repair” pretty quickly, so it’s best to take action as soon as you notice it. Now, let’s go through the steps you can take to remove it.
How To Remove Moss From Shingles On A Roof

When it comes to common roof problems, the easiest way to limit damage is to tackle the issue early. If you see moss forming on the roof, follow these steps to remove it.
Step 1: Safety First
Roof work can be dangerous, and safety should be your first concern before starting any moss removal. A fall from even a one-story roof can lead to serious injuries, so take the time to prepare. Here are a few safety basics:
- Use a sturdy ladder: Make sure your ladder is stable, with anti-slip feet, and positioned on a flat, dry surface. If possible, have a second person there to hold the ladder steady.
- Wear non-slip shoes: Roofs can be slippery, especially when wet or covered in moss. Wearing shoes with rubber soles and good grip can help keep you steady.
- Consider a harness: For steep roofs, a harness and anchor system can add an extra layer of protection. These safety harnesses are widely available at hardware stores and offer peace of mind when working on tricky surfaces.
- Check the weather: Avoid working on your roof during or right after rain, when the surface can be especially slick. Sunny, dry days are ideal, as they reduce the risk of slipping and give you better visibility.
Step 2: Gather Necessary Tools For Roof Cleaning
For roof moss removal, you don’t need many tools, and most of the things required will likely be in your home. Here’s a list of what you’ll need:
- Soft-bristle brush or broom: Avoid anything metal or too abrasive, as it can damage shingles.
- Water hose: High-pressure washers can be tempting, but they can also do serious damage to shingles and granules, so a regular hose is best.
- Cleaning solution: Either buy a commercial moss remover (just follow the instructions carefully) or make a DIY solution. A mix of 50% water and 50% household bleach usually works well.
- Protective gear: Gloves, eye protection, and a mask if you’re using bleach.
Step 3: Start To Clean Your Roof
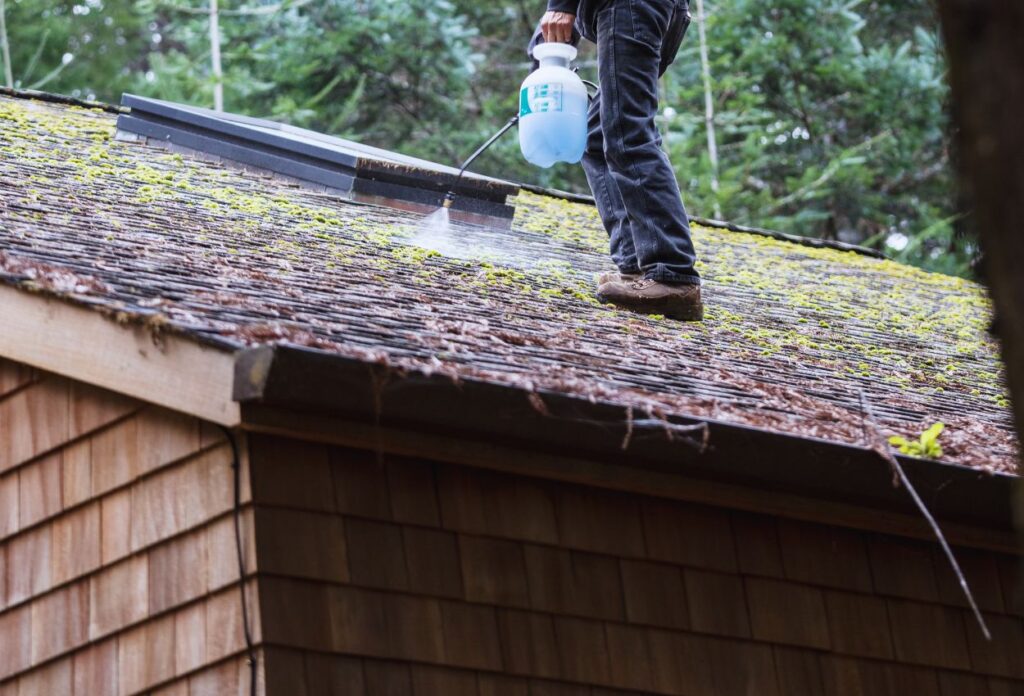
The first step in removing moss or other things like mold or debris from your roof is to thoroughly clean the entire surface. This should be done before targeting any specific problem areas. Then move to the specific shingles that have moss growing on them. This is essential because wetting the moss makes it softer and easier to remove without tearing up the shingles.
Here is a useful tip: Most roofs have a large area, and to get things done quickly you might want to use a pressure washer. However, resist the urge. A pressure washer is too powerful and can harm the shingle. It can also blast off shingle granules (the top layer of the shingle) and damage the roof’s surface, leaving you with more problems than moss alone.
Step 4: Apply Roof Moss Remover
After rinsing the moss, it’s time to apply a cleaning solution to loosen its grip on your shingles. There are two main options: you can either purchase a commercial moss remover from the store or make a DIY solution. Both methods can be effective, so let’s break down the pros and cons:
Option 1: Commercial Roof Moss Remover
These products are specifically designed to target moss on roofing materials. They’re easy to use, and most come with straightforward instructions on dilution and application. Just be sure to follow the guidelines closely to avoid any damage to your roof or surrounding plants.
Option 2: DIY Solution (50/50 Bleach and Water Mix)
For a budget-friendly alternative, a simple mix of equal parts water and household bleach can do the trick. Pour this solution into a spray bottle and apply it directly to the mossy areas. Let it sit for 15-20 minutes, giving it time to work before you begin scrubbing.
Step 5: Gently Remove the Moss
Once the moss loosens up, you’re ready to start brushing it off. Take your soft-bristle brush or broom and work downwards, in the direction of the shingles. This way, you won’t lift or break any shingles. Start gently brushing away the moss—if it doesn’t come off easily, let the solution sit a bit longer. Forcing it off can end up doing more damage than good, so patience is key.
Warning: Avoid scraping at the moss or getting too aggressive with the brushing, as it can remove the shingle granules that protect your roof.
Step 6: Rinse the Roof
After brushing off the moss, rinse the roof again with your garden hose to wash away any remaining solution or moss residue. This will also help protect any nearby plants or grass from bleach exposure. Make sure to give the roof a good rinse, as any leftover solution could affect the roof surface over time.
How To Prevent Moss Growth In The Future?
Now that you’ve tackled the moss, you’ll want to prevent it from coming back. Moss tends to grow in shady, damp areas, so improving airflow and sunlight exposure on your roof is a big help. Here are a few quick tips:
- Trim nearby tree branches: The more sunlight, the better. Moss thrives in the shade, so trimming branches around your roof can make a big difference.
- Install zinc or copper strips: When it rains, zinc or copper metal strips release small amounts of minerals that are toxic to moss. This creates a natural moss barrier, helping to keep your roof clear.
- Regular roof inspections and cleaning: Moss removal isn’t a one-and-done job. Checking your roof annually or semi-annually can help you catch any moss growth early before it becomes an issue.
Hire Us For a Roof Inspection In Oklahoma!
We hope that with this guide on roof cleaning and moss removal, you can now take better care of your roof. Removing moss from your roof can be done with a few tools, some time, and effort, however, ensure that you are taking precautions.
If you’re in Oklahoma and want a professional, thorough roof inspection, we’re here to help. Our team at A. Fricker Roofing and Waterproofing has the expertise, tools, and know-how to handle moss removal safely and effectively. Contact us today at (918) 402-7167.


