Essential Steps to Prepare Your Property for EPDM Roof Installation

Key Takeaways:
How to Prepare for an EPDM Roof Installation:
- Prioritize Deck Inspection: The most crucial part of preparing for an EPDM roof installation, professionally inspect and repair your existing roof deck for structural integrity, ensuring a stable, smooth foundation.
- Thoroughly Clean the Surface: Remove all old roofing materials, debris, and residue; repair any deck damage or unevenness for a perfectly smooth installation platform.
- Install Proper Insulation: Select rigid foam insulation such as polyiso based on local weather and building codes, installing it precisely with staggered joints and a vapor barrier.
- Plan for Weather: Schedule EPDM installation between 45 and 85 degrees Fahrenheit, avoiding rain, high humidity, or strong winds for optimal adhesive bonding.
EPDM roofing systems require meticulous preparation to achieve top performance and longevity. This synthetic rubber membrane offers exceptional durability for flat and low-slope roofs, but successful installation depends entirely on proper groundwork completed before the membrane touches the roof deck.
Understanding how to prepare for an EPDM roof installation involves coordinating multiple critical phases that span several days to weeks. The roof deck preparation steps must address structural integrity, moisture barriers, and insulation requirements. Commercial roof preparation typically demands more extensive planning than residential projects due to larger surface areas and complex drainage systems.
Property owners who invest time in thorough preparation see dramatically better results from their EPDM membrane installation process. The preparation timeline typically involves time needed for the roof deck inspection, surface cleaning, insulation installation, and material staging. Flat roof insulation requirements vary based on climate conditions and building codes, making professional assessment essential.
Proper coordination ensures all EPDM roofing materials needed arrive on schedule and weather conditions align with installation requirements. Each preparation step builds upon the previous work, creating the foundation for a watertight roofing system that protects property investments for decades.
Evaluating Your Current Roofing Structure and Deck Condition
Before beginning any EPDM membrane installation process, a thorough assessment of the existing roof structure forms the foundation of successful preparation. The roof deck must demonstrate enough structural integrity to support the new EPDM system, including additional loads from insulation and membrane materials.
Professional inspection reveals critical issues such as sagging areas, rotted decking, or inadequate fastening that could compromise the entire installation. Structural engineers evaluate the load-bearing capacity of the roof to ensure the deck meets current building codes and can handle the combined weight of new roofing materials. This assessment becomes particularly important when flat roof insulation requirements add significant weight to the existing structure.
Common deck problems include moisture damage, inadequate slope for proper drainage, and deteriorated fasteners that need replacement before proceeding. The roof deck preparation steps must address these deficiencies to create a stable platform for the EPDM system. Contractors typically require deck repairs to meet specific deflection standards and provide uniform support across the entire surface.
Understanding how to prepare for an EPDM roof installation means recognizing that structural shortcuts lead to premature system failure and expensive repairs. Proper deck evaluation ensures the membrane receives consistent support and maintains its watertight seal throughout its expected lifespan.
Gathering Required Materials and Tools for Your EPDM Project
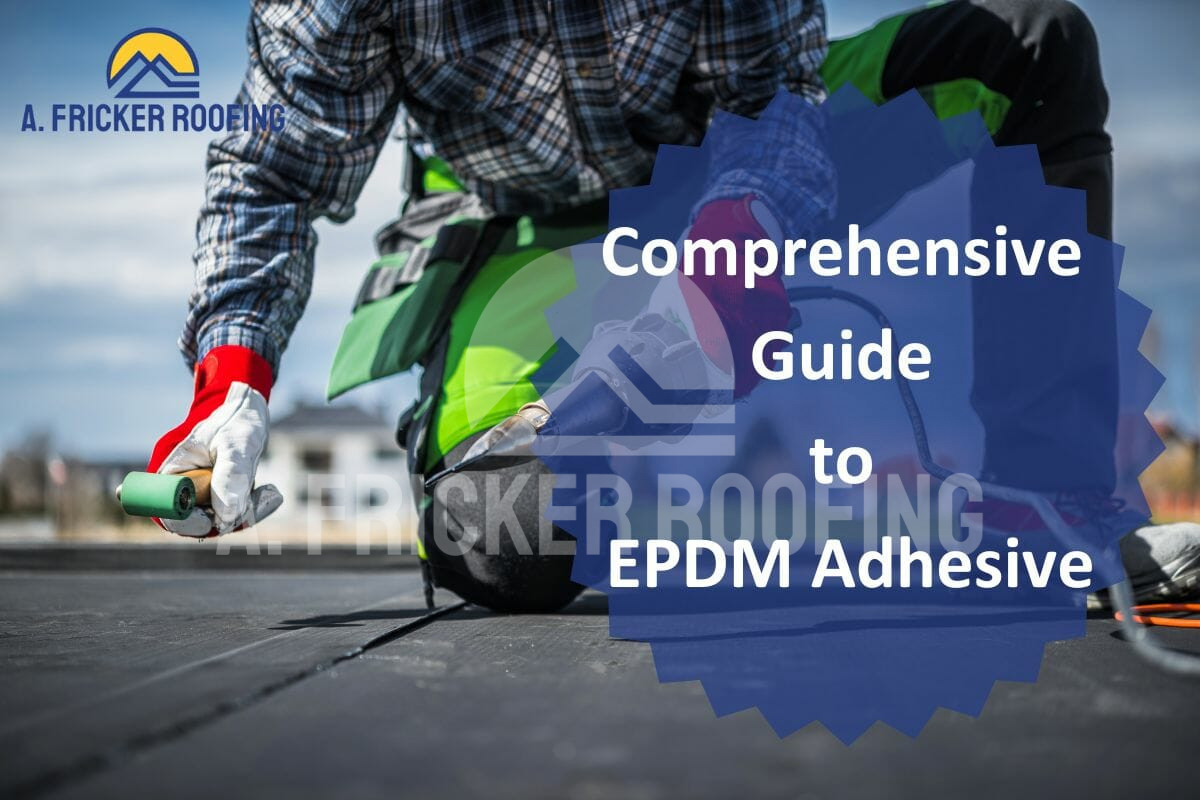
Successful EPDM installation depends heavily on having the correct roofing materials before work begins. The membrane itself represents just one component of a comprehensive system that includes special adhesives, seam tape, and fastening hardware designed specifically for EPDM applications.
Essential materials include the EPDM membrane cut to proper dimensions, contact adhesive for bonding, seam primer for joint preparation, and cover strips for sealing penetrations. Mechanical fastening systems require corrosion-resistant screws, plates, and batten strips that meet manufacturer specifications. Water-based adhesives offer environmental advantages while providing strong bonds between membrane and substrate.
Specialized tools ensure proper installation and that materials are handled correctly throughout the project. Professional contractors rely on weighted rollers for adhesive activation, heat guns for seam welding, and membrane knives for precise cutting. Temperature and humidity monitoring equipment helps determine the best conditions for adhesive application and membrane positioning.
Quality commercial roof preparation recommends staging all materials on-site at least 24 hours before installation to allow temperature equalization. Proper material storage protects adhesives from temperature extremes and prevents membrane contamination. Having backup quantities of critical materials also prevents project delays when unexpected repairs or adjustments become necessary during installation.
Properly Preparing the Roof Deck Surface
Creating an optimal installation surface requires comprehensive cleaning and removal of all existing roofing materials from the deck. The roof deck preparation steps begin with stripping away old membranes, adhesive residues, and accumulated debris that could interfere with proper adhesion of the new EPDM system.
Power washing and mechanical scraping remove stubborn adhesive deposits and organic growth that compromise bonding surfaces. All loose fasteners, protruding nails, and damaged deck boards require attention before the EPDM membrane installation process can proceed. Contractors use specialized solvents to eliminate oil stains and chemical residues that prevent proper adhesive curing.
Surface irregularities such as gaps between deck boards, protruding fasteners, and uneven joints must be addressed to create a smooth installation platform. Wood decking typically requires sanding of rough areas and filling of significant gaps with appropriate patching compounds. Metal decking needs rust treatment and primer application to prevent corrosion beneath the membrane system.
Understanding how to prepare for an EPDM roof installation means recognizing that surface preparation directly impacts how long the system will last and its performance. A properly prepared roof deck ensures uniform membrane contact, prevents punctures from debris, and allows adhesives to achieve maximum bond strength throughout the installation area.
Installing Appropriate Insulation and Underlayment Systems
Proper insulation selection and installation creates the thermal barrier essential for EPDM system performance and building energy efficiency. The requirements for your flat roof insulation will depend on local climate conditions, building codes, and specific thermal performance goals for the structure. Rigid foam boards typically provide the best combination of insulation value and structural stability for EPDM applications.
Polyiso and EPS boards offer excellent thermal resistance while maintaining dimensional stability under membrane loads. Insulation thickness calculations must account for local energy codes and desired R-values, with most commercial applications requiring multiple layers to achieve target performance levels. The roof deck preparation steps include verifying adequate structural capacity to support the additional insulation weight.
Installation techniques require precise board placement with staggered joints to eliminate thermal bridging and maintain continuous coverage. Mechanical fasteners secure insulation boards directly to the deck using corrosion-resistant screws with large-diameter plates. Adhesive application provides supplemental attachment while creating airtight seals between adjacent boards.
Vapor barrier installation beneath the insulation prevents moisture migration that could compromise thermal performance and cause structural damage. Understanding how to prepare for an EPDM roof installation includes coordinating insulation placement with penetrations, drains, and roof edge details. Proper underlayment systems create the stable platform necessary for successful EPDM membrane installation process completion.
Planning for Weather Conditions and Installation Logistics
The seasonal timing of the installation plays a crucial role in its success, requiring careful coordination between seasonal conditions and project scheduling. Temperature ranges between 45 and 85 degrees provide the best conditions for adhesive curing and membrane handling during the installation process. Cold weather makes EPDM membranes stiff and difficult to position, while excessive heat can cause premature adhesive setup and membrane expansion issues.
Rain or high humidity levels during installation can prevent proper adhesive bonding and compromise the integrity of seams throughout the system. Wind conditions above 25 mph create safety hazards and make large membrane sheets unmanageable during positioning and attachment. Professional contractors monitor weather forecasts closely to identify suitable installation windows that provide several consecutive days of favorable conditions.
Successful commercial roof preparation protocols include planning for weather delays and material protection. Understanding how to prepare for an EPDM roof installation means scheduling flexibility around unpredictable weather patterns while maintaining project momentum and protecting completed work phases from environmental damage.
Final Pre-Installation Checklist and Safety Preparations
Completing comprehensive final inspections before beginning the EPDM membrane installation process prevents expensive delays and ensures quality installation conditions. The checklist verification covers all preparation phases from structural integrity to material readiness, confirming that each component meets manufacturer specifications and project requirements.
Critical measurements require final verification to ensure accurate membrane sizing and proper overlap calculations at seams and penetrations. Roof deck preparation steps receive thorough review to identify any missed repairs or surface irregularities that could compromise membrane performance. Insulation placement and fastening patterns need confirmation before adhesive application begins, as corrections become extremely difficult once the installation process starts.
Safety protocols establish protective measures for installation crews working with chemical adhesives and handling large sheets of EPDM in elevated places. Personal protective equipment needed may include respiratory protection during adhesive application, fall arrest systems for all roofing work, and specialized footwear to prevent membrane damage. Emergency procedures address weather-related evacuations and medical situations that may arise during installation.
Material staging areas receive final organization to ensure efficient workflow and minimize membrane handling during positioning. Understanding how to prepare for an EPDM roof installation includes establishing clear communication protocols between crew members and confirming all EPDM roofing materials needed remain within specified temperature ranges for optimal performance during the critical installation phase.
Trust A. Fricker Roofing and Waterproofing for Your EPDM Roof Installation Needs
Preparing for an EPDM roof installation is crucial to the longevity and effectiveness of your roofing system. At A. Fricker Roofing and Waterproofing, we understand that every detail matters, from inspecting your current roofing structure to ensuring the deck is perfectly prepped for installation. Don’t overlook the importance of professional guidance in selecting the right materials and executing the necessary preparation steps.
Ready to ensure your property is perfectly prepared for an EPDM roof? Call us today at (918) 402-7167 to schedule a consultation with our expert team. We’ll help you understand every aspect of the preparation process and ensure your roof installation is a resounding success. Don’t wait, secure your property’s future with A. Fricker Roofing and Waterproofing now!